Your Turnitin guidance is moving!
We’re migrating our content to a new guides site. We plan to fully launch this new site in July. We are making changes to our structure that will help with discoverability and content searching. You can preview the new site now. To help you get up to speed with the new guidance structure, please visit our orientation page .
Before you begin - This guidance is relevant to administrators who have a Turnitin Originality, Turnitin Similarity, or SimCheck license.
Not sure? If you access Turnitin via a URL unique to your institution (for example: https://universityofturnitin.turnitin.com), you've found the correct guidance.
If you access Turnitin via turnitin.com or turnitinuk.com, check out the guidance relevant to you.
If you change your Canvas environment URL after previously registering the Plagiarism Framework integration, the integration will break if your institution chooses to have Canvas automatically configure a domain redirect from the old URL to the new URL. For more information, please contact Canvas support.
Your Turnitin license is designed around empowering your organization to take control of plagiarism. You have access to an intuitive Similarity Report, providing text matches and an indicative similarity score. With a seamless integration with Canvas, your Turnitin license can easily be incorporated into your institution's academic integrity strategy.
Step 1 - Setting up Turnitin in Canvas
- Log into Canvas as an administrator.
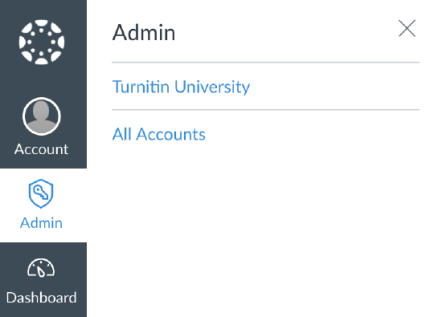
- From the side of any page within Canvas, select the Admin tab.
- Select the account you'd like to configure with Turnitin.

- From the left-hand navigation, select Settings.

-
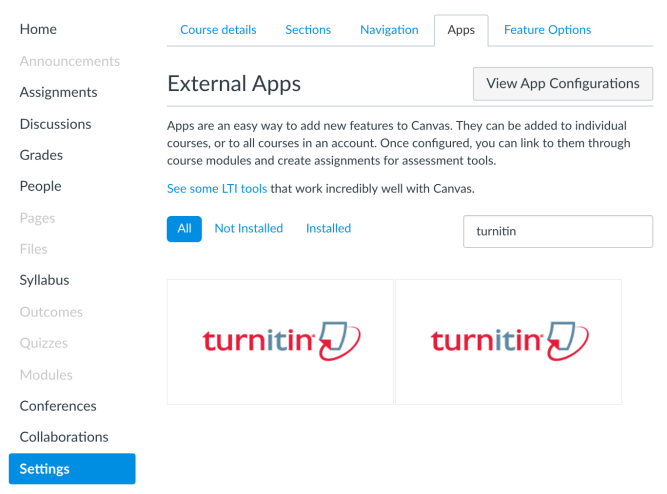
Select the Apps tab from the top of the Settings page.
-
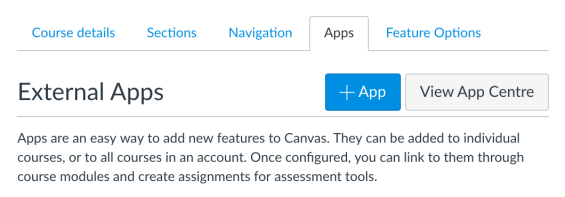
Select View App Configurations.
-
Select the + App button to open the Add App pop-up box.

- Change the Configuration Type to By LTI 2 Registration URL.
-
Enter the following URL:
https://[your institution].turnitin.com/lti/register -
Select the Launch Registration Tool button.
-
Enter the email address and password associated with your Turnitin administrator account.
-
Select Log in.
- Enter a name for your integration. We'd recommend choosing something memorable to make changing settings easier later on.
The name you choose is how Instructors will identify Turnitin when creating an assignment.
- Select the Confirm button to complete the configuration.
- To start using Turnitin, you must enable the app. Select Enable to continue.
That's it! Should you need to disable the app, select the cog icon, Edit, then Disable. Once you've enabled the app, you can change some account wide settings that will change what data from within your institution instructors will have access to.
Step 2 - Changing account wide admin settings
After you have initially set up your integration, there are several options that you can configure that will change how much data instructors from within your institution will have access to.
The following permissions impact how data can be shared across your institution. This data is the exclusive responsibility of your institution so when setting these permissions, consider whether they fully comply with your institution's policies regarding student records.
- Log into Canvas as an administrator.
- From the side of any page within Canvas, select the Admin tab.
- Select the account you'd like to configure.

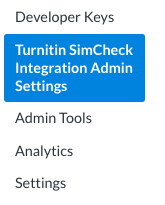
- If your integration has been enabled for the account, you'll find a new setting option in the sub-menu to the left of the screen. You will see this as '[Name of your integration] Admin Settings'.

- Use the checkboxes to change the settings to best suit your institution.
Allow instructors within your institution to view the full text of submissions for internal matches
When there is a match in a Similarity report, we give basic information about the match to preserve the intellectual property rights of the original uploader. If you have an agreement with the uploader, such as an institutional data privacy policy, you can use this setting to determine how much of a match other instructors within your institution will have access to.
Enabling this setting will show the full source text of the file that was submitted, it won't provide the original file or display further personal information about the matching student unless that information was included in the body text of the file.
Example
A student submits a .doc file to Class A.
The instructor of Class A automatically has access to the full similarity report.
A student in Class B has copied from the student in Class A, resulting in a match.
Normally, the instructor of Class B would not be able to view any of the original file. Enabling this setting will show them the full text of the submission.
This setting only applies to matches within your institution. Any submissions that are indexed to our global database, or any matches to the global database, will not display the full text of the matching source.
Allow instructors within your institution to view submission information for internal matches
By default, we only display very basic information about a source. This setting will provide more metadata about a submission to instructors within your institution. This includes, the student name, ID, and assignment title.
Save viewer changes
When you set exclusion options within the viewer to refine the similarity report, it will not automatically retain this refined view on leaving the view. Selecting this option will make any changes you make persist and update the similarity score accordingly.

- All done? Use the Update Settings Button to save your changes.
Was this page helpful?
We're sorry to hear that.
